 Contact Us
What is the Productivity Toolbox?
The Sprint365 Productivity Toolbox is a set of tools designed to help you learn, navigate, and work more efficiently in Microsoft Dynamics 365. Whether you’re new to D365 or an experienced user, the Toolbox gives you instant access to training, support, and process guidance—all in one place.
What’s inside?
✔️ Academy: Online video courses to help you learn D365 at your own pace.
✔️ Help Center: A library of support articles and step-by-step guides.
✔️ Ask AI: An AI-powered chat that works alongside you in D365, providing instant answers.
✔️ Business Processes: A business process manager that helps you follow and document key D365 workflows.
All these tools are housed in the Productivity Center, your Toolbox hub. This central platform makes it easy to access everything you need to boost adoption, improve efficiency, and get the most out of Dynamics 365.
To learn more about the Sprint365 Productivity Toolbox, you can read the Welcome Guide, which covers all the fundamentals of the Productivity Toolbox and each of the tools inside.
This Admin guide will cover:
- User types
- License overview
- User management
- Frequently asked questions
- How to get support
- About Sprint365
User Types
Admin Users
As an Admin User, you have full access to all four tools in the Productivity Toolbox—Academy, Help, Ask AI, and Business Processes—just like any end user (as long as your organization has assigned you the appropriate licenses). But your role goes beyond just using the tools.
You can:
- View your company’s license overview.
- Add, edit, activate, or deactivate users.
- Assign and manage user licenses.
- Bulk import user details to streamline onboarding.
- Soon, you’ll also be able to access analytical dashboards showing how your team is using the Productivity Toolbox.
You’re the Productivity Toolbox lead within your company. You help ensure that your team is onboarded smoothly, has the right access, and gets the most value from the platform.
End Users
As an End User, you get access to all the tools you need to succeed in Dynamics 365—Academy, Help, Ask AI, and Business Processes—right inside the Productivity Center (as long as you’ve been assigned licenses).
You can:
- Learn at your own pace with video-based courses in the Academy.
- Get instant help from AI or through searchable guides and cheat sheets.
- Follow your organization’s D365 processes with step-by-step clarity.
You don’t need to worry about managing licenses or other users. Just focus on learning, navigating, and getting the job done—smarter and faster.
License Overview
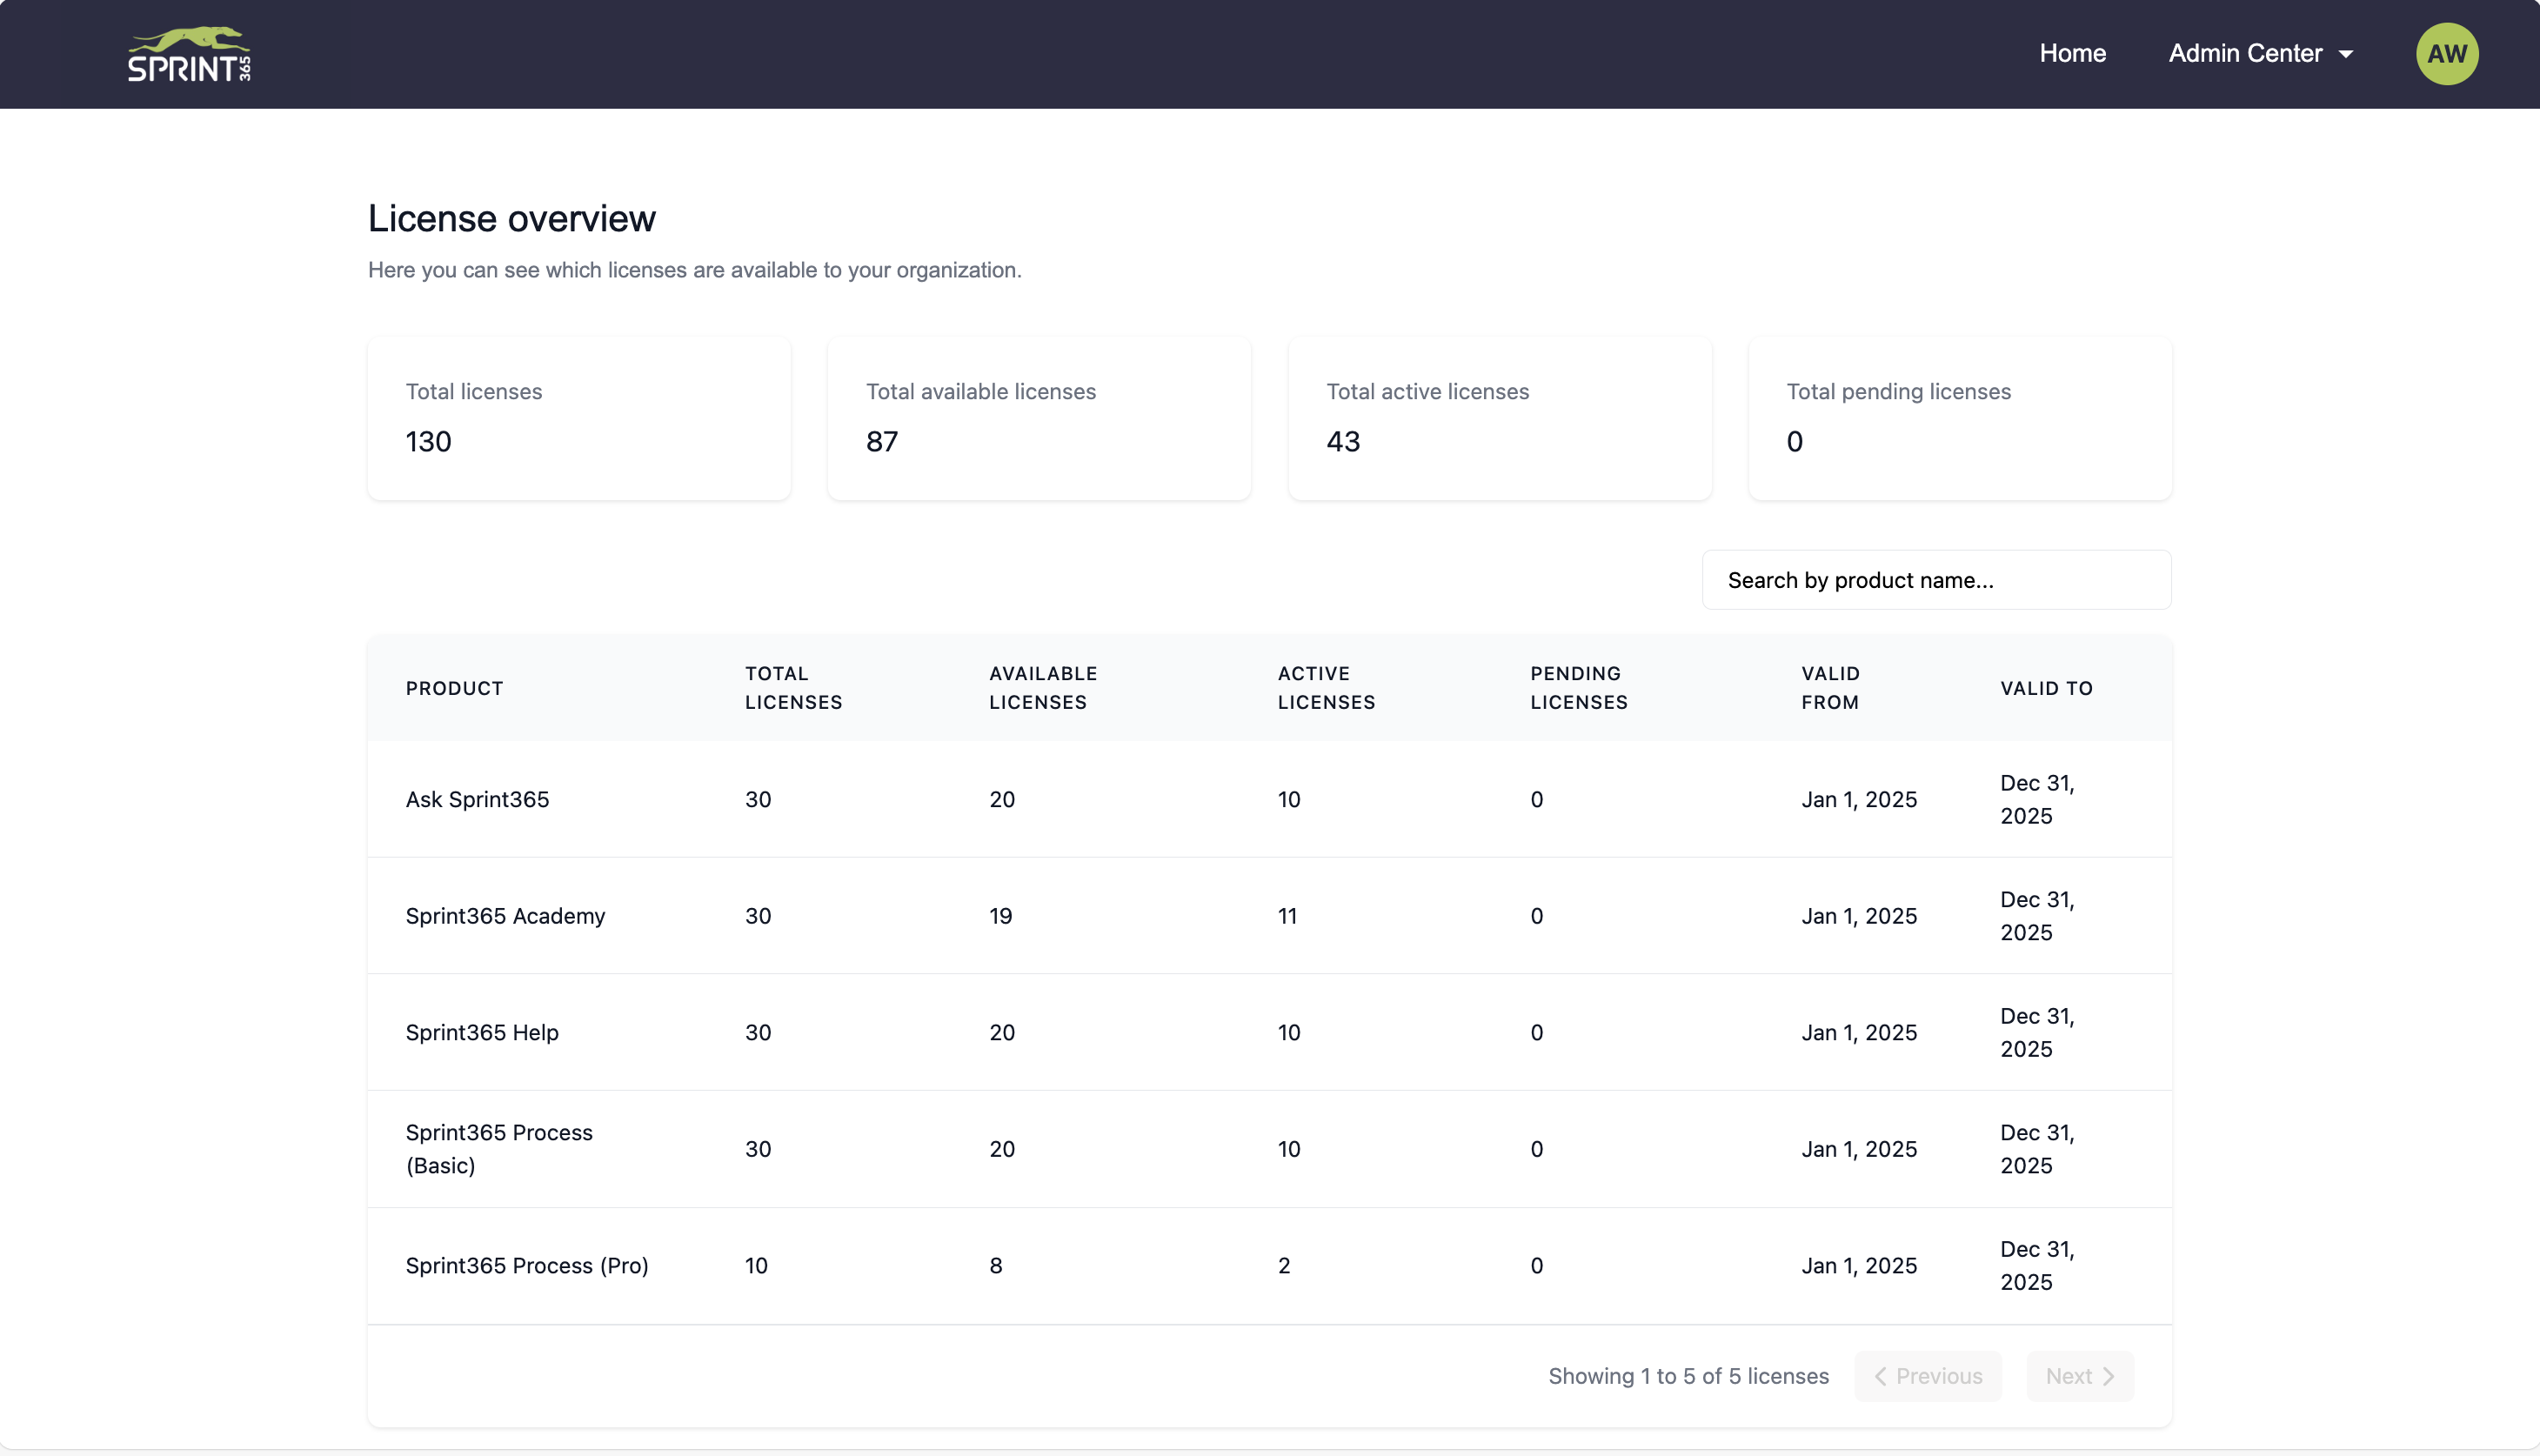
The License Overview page provides a summary of your organization’s license distribution and availability across all tools.
The four boxes at the top summarizes:
- Total licenses – The total number of licenses purchased by your organization.
- Total available licenses – Licenses that have not yet been assigned.
- Total active licenses – Licenses currently assigned and in use.
- Total pending licenses – Licenses assigned but not yet accepted by users
Below, the License Breakdown table displays the following for each tool:
- Total licenses
- Available licenses
- Active licenses
- Pending licenses
- Validity period (from and to dates)
This breakdown helps you track usage and manage access efficiently.
📌 Tip: If you run out of available licenses, you may need to reassign existing ones or purchase additional licenses.
User Management
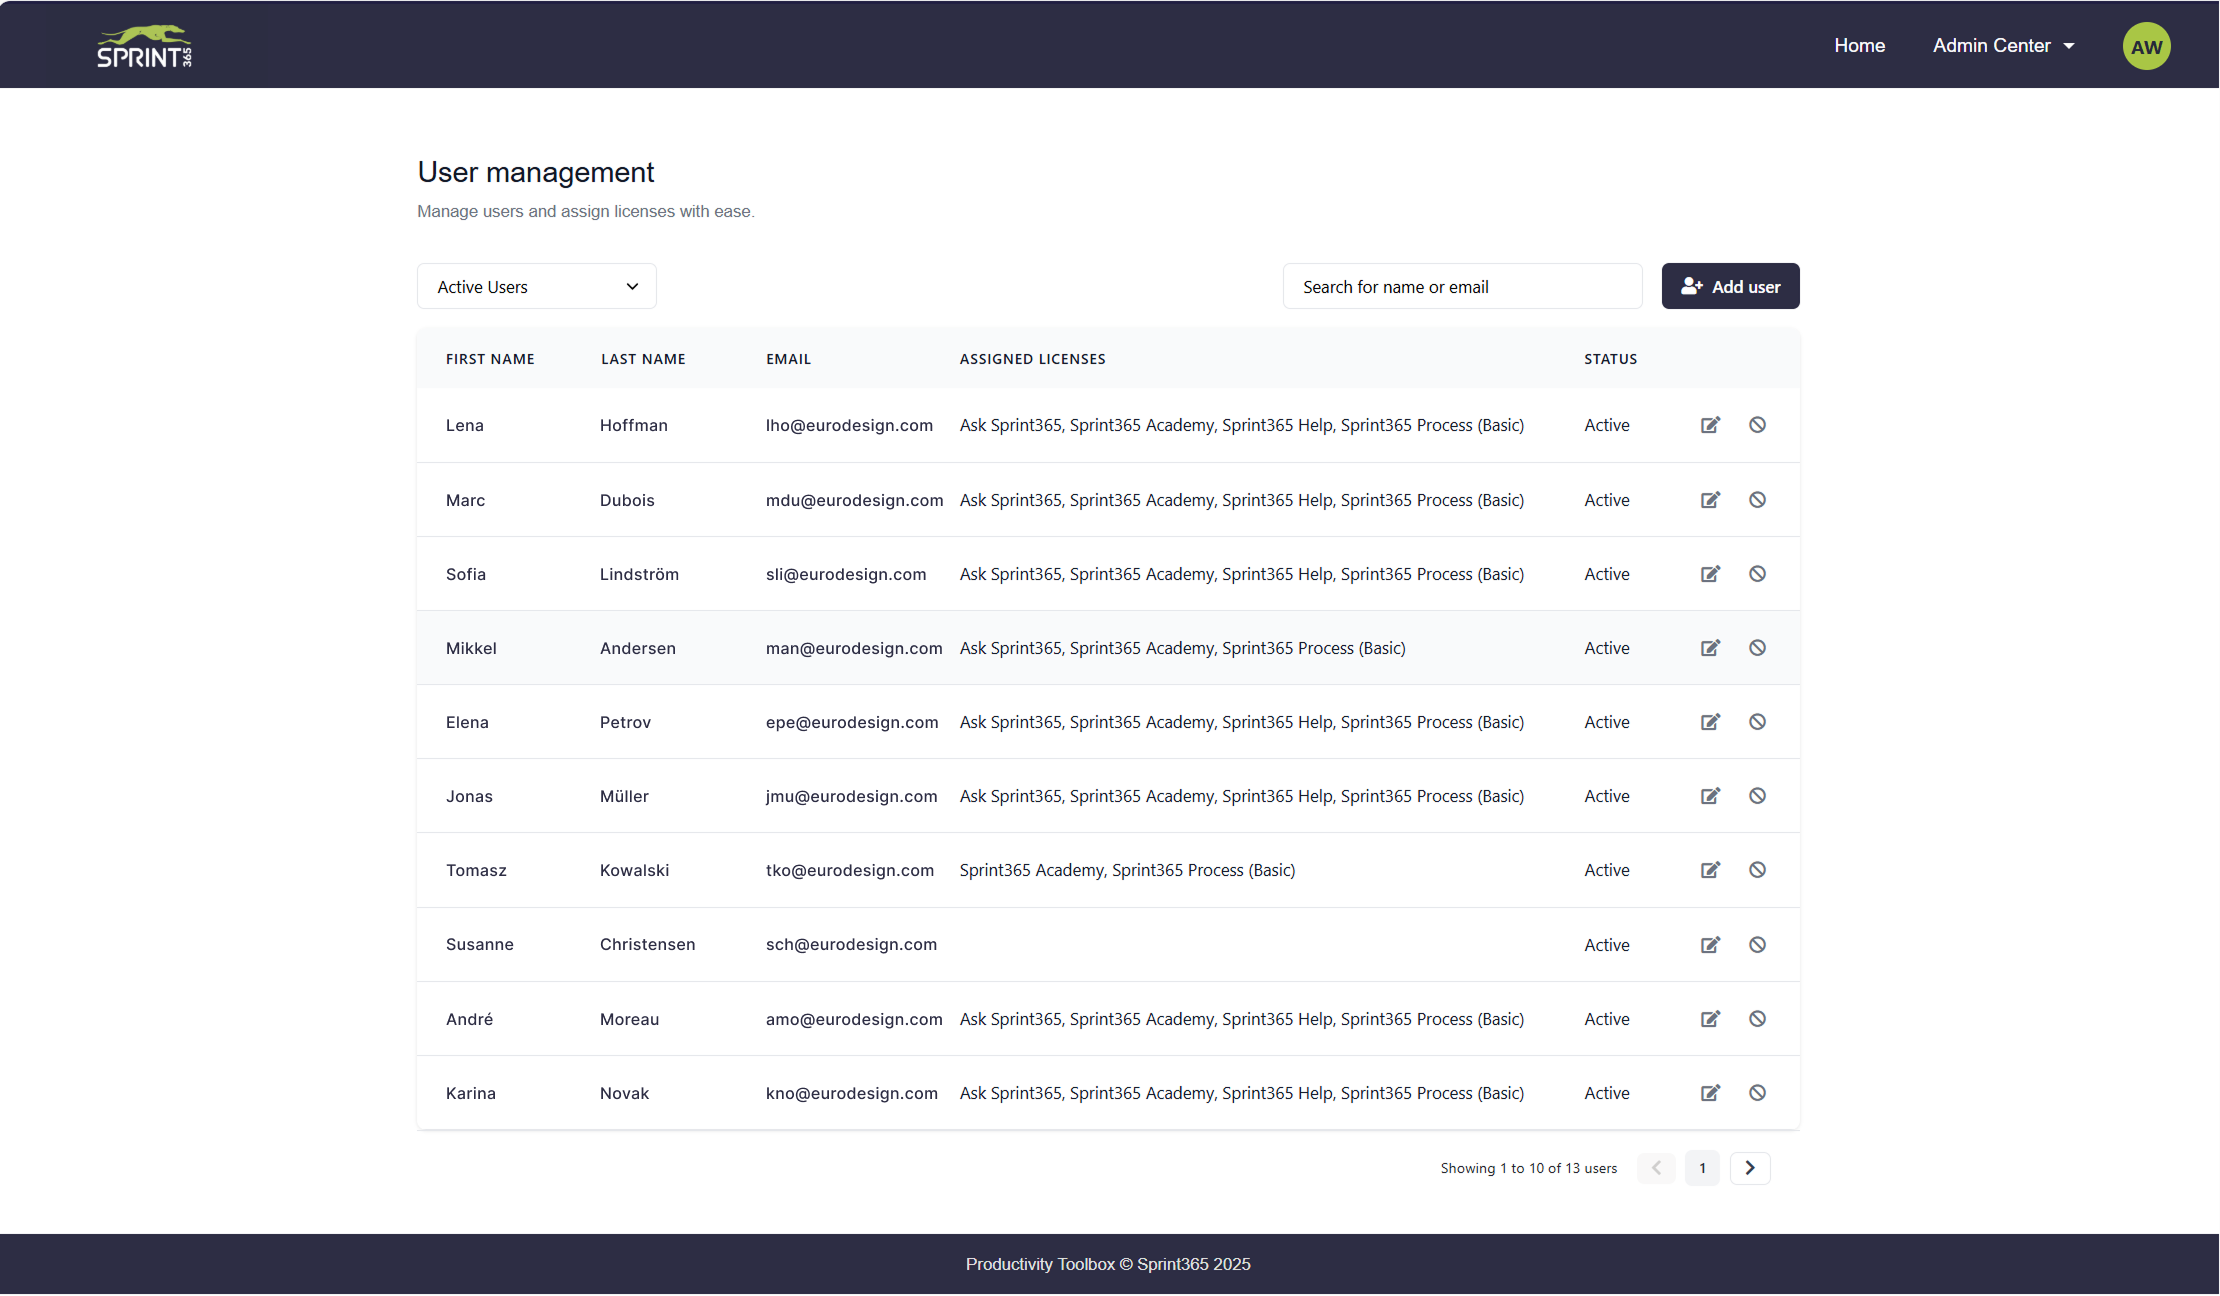
The User Management page allows you to view and manage users and their licenses in the Productivity Toolbox.
- View all users – See first name, last name, email, assigned licenses, and status.
- Assign or remove licenses – Modify access for each user.
- Deactivate users – This removes all assigned licenses but does not delete the user.
Managing Users: Add User
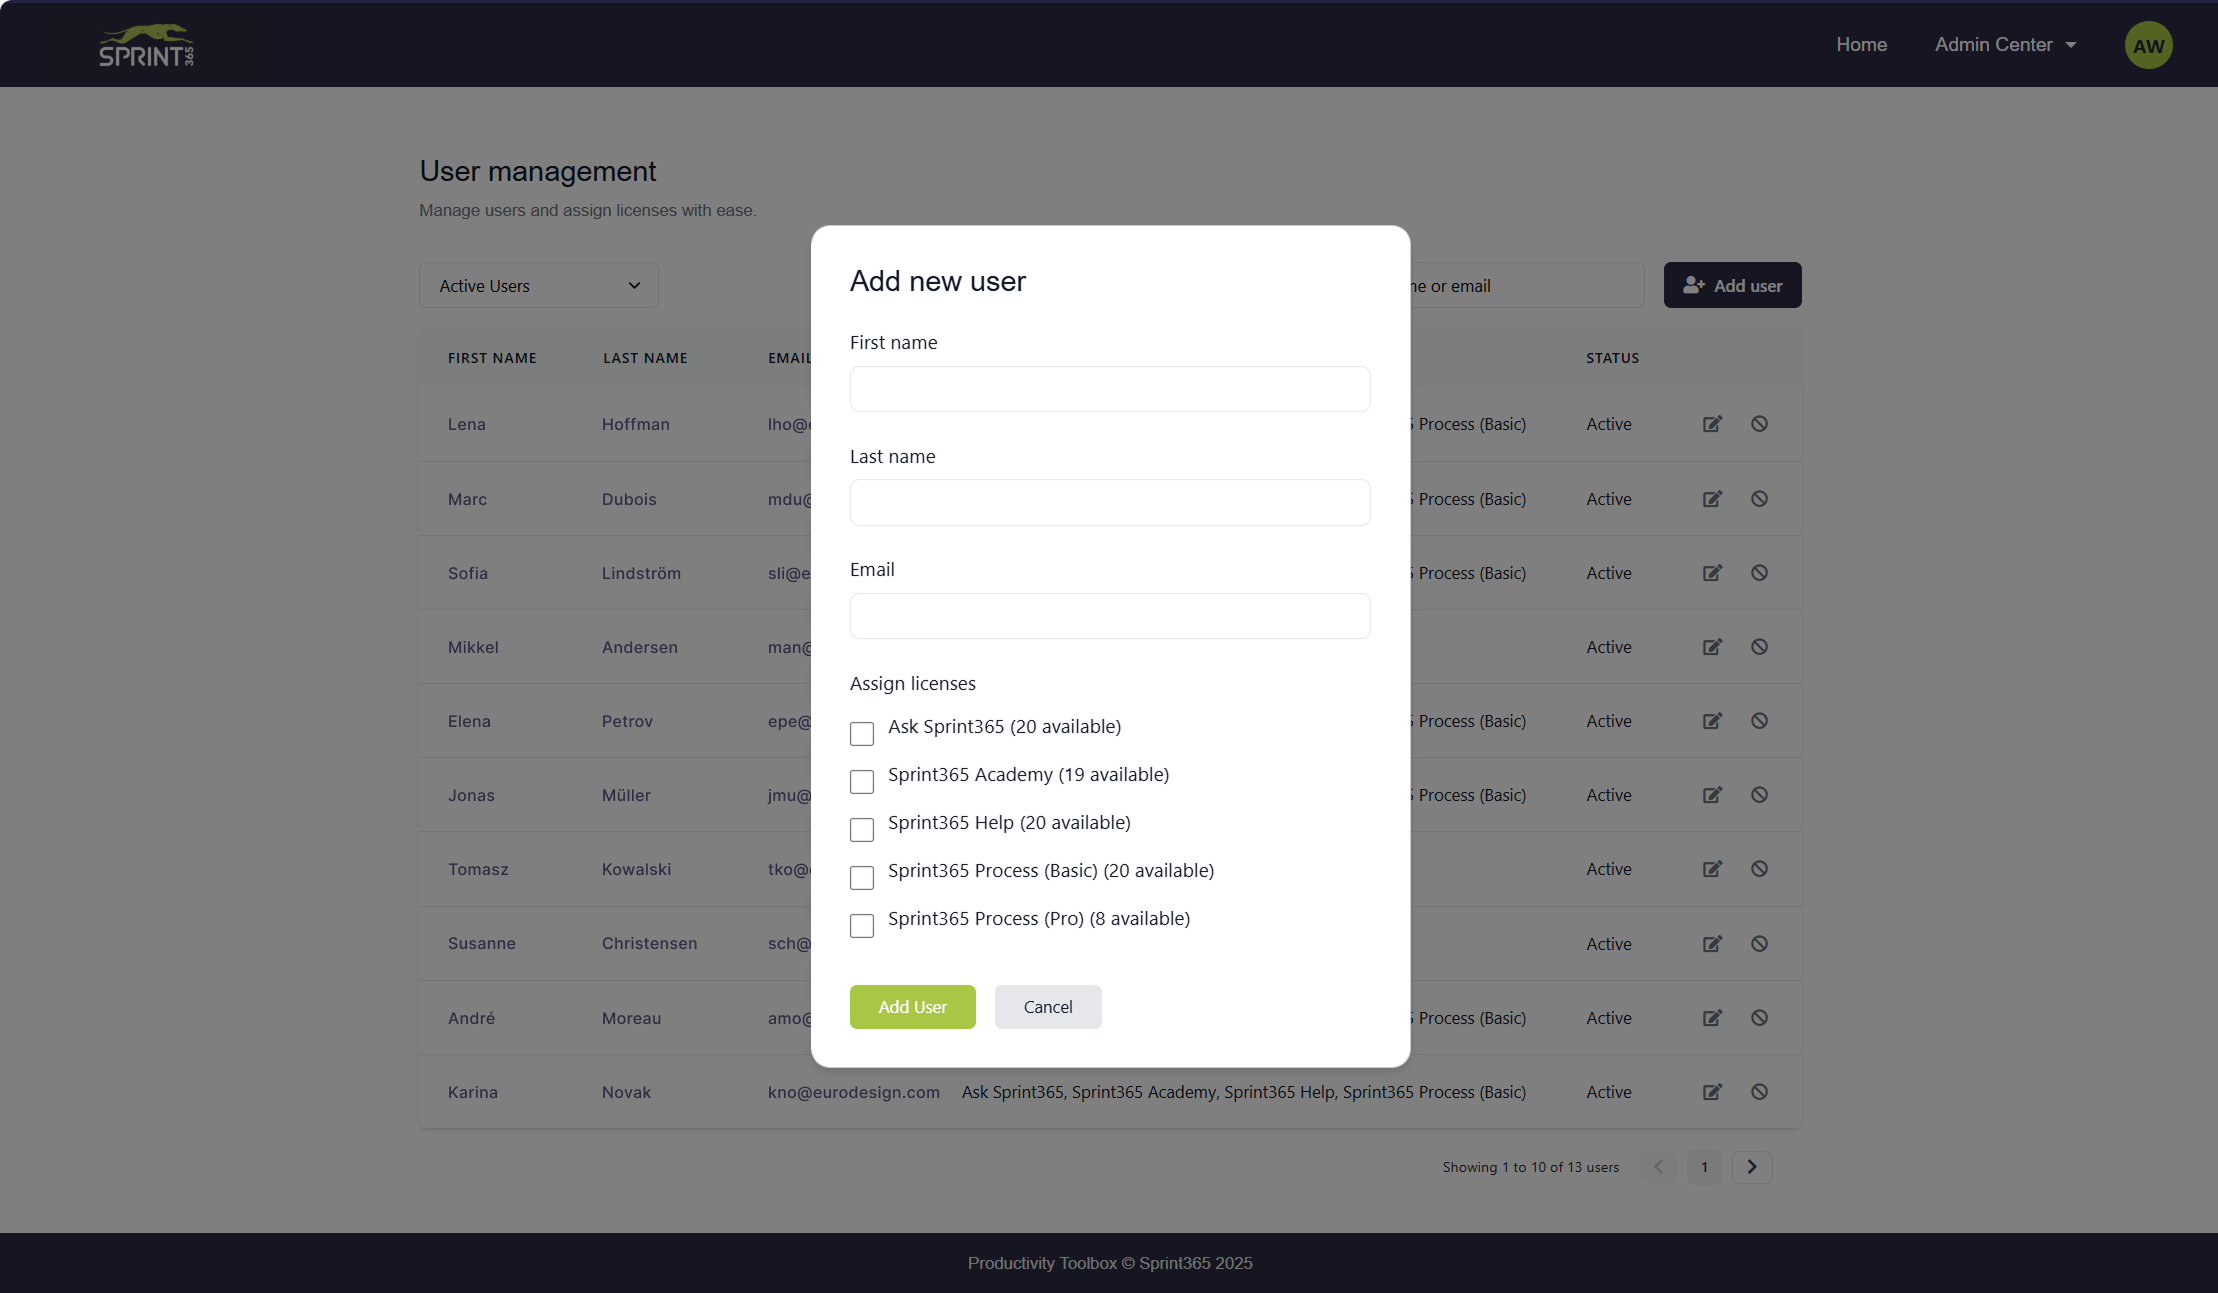
Adding a new user to the Productivity Toolbox is quick and easy. Just follow these steps:
- Click the ‘Add User’ button in the top right corner of the table.
- In the pop-up window, enter the user’s first name, last name, and email address.
- Assign licenses by selecting the appropriate checkboxes below.
- Click ‘Add User’ to complete the process.
Once added, the user will receive an email invitation with login instructions.
Managing Users: Edit User

Editing a user in the Productivity Toolbox is quick and easy. Just follow these steps:
- Click the 📝 (Edit) button next to the user’s name in the table.
- In the pop-up window, you can edit the user’s first name, last name, and email address.
- To assign or unassign licenses, simply select or deselect the relevant checkboxes.
- Click ‘Update User’ to complete the process.
Once added, the user will receive an email invitation with login instructions.
Managing Users: Activating & Deactivating Users
Users in the Productivity Toolbox can be active or inactive. By default, all new users are set to active when added.
User Status Definitions:
- Active – The user has access to the Toolbox and assigned licenses.
- Inactive – The user has been deactivated, and all assigned licenses have been removed.
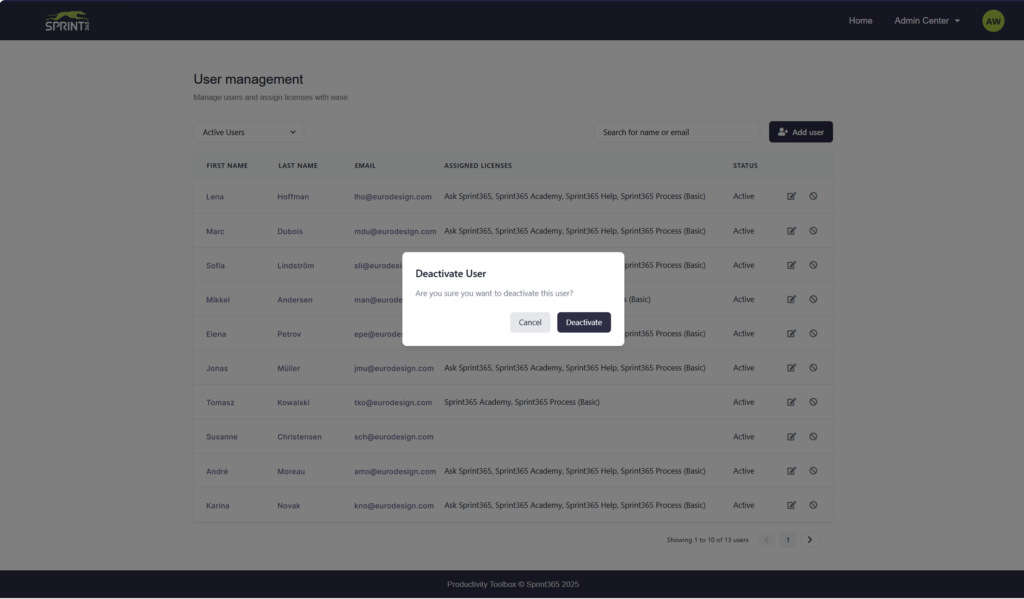
How to Deactivate a User:
- Click the ⦸ (Deactivate) button next to the user in the table.
- Confirm the deactivation in the prompt.
What happens when you deactivate a user?
- The user’s licenses are immediately revoked.
- Their account remains in the system but without access to the Productivity Center or any tools.
How to Reactivate a User:
- Click the ☑ (Activate) button next to the inactive user.
- Once activated, reassign licenses by editing the user’s profile.
📌 Good to know:
- Deactivation is not permanent—users can be reactivated anytime.
- Admins cannot delete users. To permanently remove a user from the system, please contact support@sprint365.io.
Managing Users: Bulk import users
The bulk import feature is coming soon!
Frequently Asked Questions
How do I add new users to the Toolbox?
Upload a CSV file containing user details. Once added, users will receive an email invitation to the Productivity Toolbox.
A user hasn’t received their invitation email. What should I do?
Ask them to check their spam folder. If it’s still missing, please contact support.
Can I assign licenses to multiple users at once?
Yes! You can use the bulk import feature in User Management to assign licenses efficiently. While the feature is in development, please contact support@sprint365.io to bulk add or bulk assign users in the Toolbox.
Can I revoke a user’s access?
Absolutely. If you want to unassign licenses from a user, you can edit the user’s licenses under Edit users. Alternatively, you can deactivate a user, which removes all their licenses and their ability to log into the Productivity Center.
We need more licenses. How do we get them?
Reach out to your Sprint365 account manager or support@sprint365.io to discuss additional licenses.
How to Get Support
If you encounter any issues, we’re here to help!
- Help Center: Find step-by-step guides and FAQs
- Email Support: support@sprint365.io
About Sprint365
At Sprint365, we specialize in making ERP implementation smarter, faster, and easier. The Productivity Toolbox is our way of helping you get the most out of Microsoft Dynamics 365—whether you’re just starting or optimizing your processes.
Want to learn more? Visit our website.